Creating CWPP Projects in the Planner Application
This section provides step-by-step guidance for reporting CWPP projects in the Planner.
Note: If the CWPP efforts were also part of a Grant Funded Project, this CWPP guidance should be followed, NOT the Grant Funded Project guidance. Appropriate grant funding sources should be added to Projects and Activities where relevant.
Creating a CWPP project in Planner
All CWPPs should be entered as a ‘Project’ under the appropriate DPA Plan Year (work plan) by staff responsible for signing CWPP.
Click ‘+Create’, ‘New Project’ in the upper right corner.
Details
Project Name: Community Name CWPP Year (ex. Blackhawk Ranch CWPP 2024).
To avoid duplicate entries, search the database before creating a new CWPP project.
Deed Name: Leave blank.
Status: Related to the time of entry into GeoTracks. Most CWPP (plans) projects should be entered as “In-Progress”.
Select ‘Planned’ if development of a new CWPP is anticipated in the DPA fiscal year (e.g., Saguache County has announced plans to develop a CWPP in the upcoming year but work has not yet been initiated).
Select ‘In-Progress’ for all CWPPs that are currently under development.
Note: In addition to creating the CWPP (plan) project in Planner, a corresponding activity for CWPP development should also be created. Additional activity entries are created for each CWPP activity completed (e.g., CWPP review, meetings, technical guidance, etc.).
Select ‘Completed’ for plans that were signed and approved. Enter the Start Date when CWPP development began. Enter the End Date when the CWPP was completed and signed.
Do NOT use ‘Closed’ unless a community is no longer aware of/using the CWPP.
DPA Plan: Select current DPA plan year for the respective area the CWPP is located within (e.g., Northeast Area FY 2024).
For new sites, select the appropriate plan.
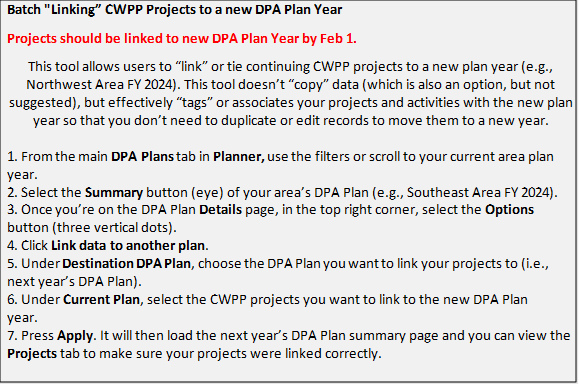
For existing plans, a “batch linkage” will need to occur annually to update the projects with the appropriate, current plan.
Staff Responsible: Enter the name of the individual who is the primary point of contact for CWPP development.
Unit of Measure: Select ‘Each’.
Dates: Enter CWPP dates.
Start: Date the CWPP plan development started.
End: Date the CWPP was signed.
Comments: Add any other relevant comments or information.
Click ‘Next’.
Location
Use the search function or drop a manual point within the boundaries of the CWPP.
Note: CWPP plan acres (polygon boundary) will be captured when entering activities in GeoTracks Web or Mobile Applications.
Disregard the Priority Analysis section – a shapefile doesn’t need to be uploaded here.
Click ‘Next’.
Landowner
Add CWPP community, city, fire protection district or county information by first searching the landowner database (click ‘ADD LANDOWNER’) or creating a new landowner record (click ‘CREATE LANDOWNER’). Update landowner information as needed.
To avoid duplicate entries, be sure to search the landowner database prior to creating a new landowner and avoid using abbreviations.
Example: “Durango Fire Protection District” should not be entered as “Durango FPD”.
Note: a new landowner record can be created beforehand using the ‘Landowner’ tab in Planner.
To create a new landowner record, the following information is required:
First Name: Enter the name of the community, city, fire protection district, or county in the ‘First name’ box. The ‘Last Name’ box should be left blank for CWPP plans.
Manager: Select ‘Private’ for a community or HOA, ‘City Municipal’ for a city, ‘Other’ for a fire protection district, and ‘County’ for county-level CWPPs.
The ‘Ownership’ box will auto-populate based on the selected ‘Manager’.
Address: Enter the address that is most relevant to the CWPP.
No individual landowner information should be entered for CWPPs.
Click ‘Save’.
Locate the newly created landowner record in the list or use the search function to enter the ‘First name’ of the recently created record.
Select the appropriate landowner record by checking the box to the left of the entry.
Click ‘Save’ at the bottom of the page to complete the process.
Click ‘Next’.
Funding
Funding Source: All CWPP Projects should have ‘State Fire Assistance’ and ‘HFVC’ as funding sources.
Click ‘ADD SOURCE’ and select ‘State Fire Assistance’ from the dropdown menu.
Click ‘ADD SOURCE’ and select ‘HFVC’ (Healthy Forests & Vibrant Communities) from the dropdown menu.
Account Number: Leave blank unless known.
Subaccount Number: Leave blank unless known.
If applicable, continue selecting ‘ADD SOURCE’ to include additional funding sources.
Add appropriate grant funding such as “Community Wildfire Defense Grants” or “Incentives for Local Governments” if a CWPP has additional grant funding.
Click ‘Save’. This will direct you to the project overview page.
Note: All CWPP (plan) projects should have a polygon associated with the CWPP (plan) activity created. Additional activities associated with CWPP development do not need polygons (points are preferred). Activities can be entered in Planner or GeoTracks Web/Mobile. CWPP plan acres (polygon boundary) will be captured when creating or editing activities in GeoTracks Web or Mobile Applications.
Linking CWPP projects (and activities) to a new DPA plan
This process is only needed by Area Managers: